Much of my time since December has been taken up with the planning, testing and execution of a baldaccnino for the Mackintosh Willow Tea Rooms restoration.
I don't know whether Mackintosh called the structure a baldacchino or not, but that is how it seems to be referred to by the restoration people.
Traditionally a baldacchino is an architectural structure over the altar of a church. Here it is placed over the entrance from the anti-chamber to the tea room proper as shown from the upper gallery in this indistinct photograph.
My part in this has been to develop the glass bowl forming the structure for the flower arrangements that you see supported by a column and a surrounding metal structure.
The original remit was to make an inverse dome 800mm in diameter with a 400mm depth. In fact, half a sphere. The glass would need to be at least 8mm thick. This is too heavy to blow, so a kilnforming method was looked toward.
It would be possible to construct a metal mould to slump the glass into. (ceramic would be too heavy and even more costly). This was rejected as being too costly and possibly subject to breakage due to the steep sides.
I indicated to the lead artist on the project that a free drop could provide a good approximation to the original without the markings from a mould. After discussion I was commissioned to make a prototype or example of what could be done with a free drop in a large gas kiln. I am fortunate to work in a studio complex that contains a large ceramic studio that has a gas kiln of a bit more than a cubic metre interior.
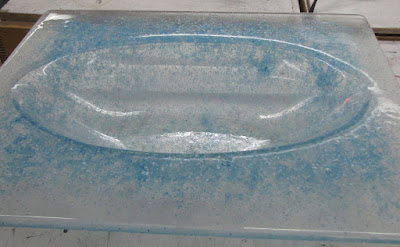
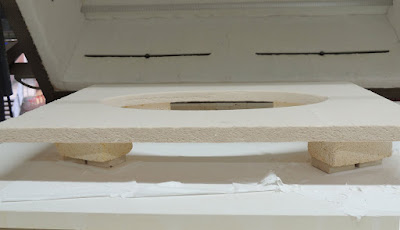
The test involved cutting an 800mm circle from a metre square fibre board of 25mm thickness. The 1000mm diameter disc of 10mm glass was centred over this aperture in the gas kiln.
 |
| Test 1 from the top |
This shows the result of the first test including the supporting structure within the kiln.
 |
| Test 1 from the bottom |
This proof of concept was accepted by the trust, but with a request for a deeper form.
For the second test I used 12mm glass, now realising where it was to be located and that, as it was to be deeper, to avoid excessive thining as the glass dropped.
 |
| Test 2 from the top |
Initially this looked to be really good. The depth was 340mm, much closer to what was envisaged by the Trust representatives. (We did have a two-person film crew watch us take out the second test and put in the third, requiring some planning of what we were going to do for the benefit of the filming).
 |
| Test 2 from the left |
But looking from underneath, it became apparent that it was not symmetrical.
 |
| Test 2 from the right |
A bit of head scratching and testing showed two things.
As we were only able to use one of the two gas burners, the glass was moving toward that heat. We alleviated the unsymmetrical shape by adding baffles.
The other thing showed by the tests for uneven firing was that we could not provide a sphere at the original depth specified. The weight of the glass pulled the whole into a parabolic shape, even though it was symmetrical.
Further discussions and investigations of the photographic evidence returned the decision that spherical was the shape required and we should try for the deepest we could get and still have a spherical shape.
Subsequent testing provided two acceptable shapes of 235mm deep.
 |
| comparisons of tests. |
This image shows the first test in the middle, the second deeper at the back and at the front, the approved shape.
When we had two pieces (one to be spare for any future breakage) the other people involved came to do mock ups, take templates of the curves and generally discuss next stages.
 |
| mock up of the plate to hold the flower containers |
 |
| mock up from the side |
Soon we will be taking these to Stornoway to apply oil industry machinery to cut the rim from the shape. When the polishing of that cutting is done, we will be travelling to Norfolk to apply marine technology to the glass, using chemical toughening.
These will be well traveled pieces of glass when complete. Only a few months to go.
To learn more about the restoration of the Willow Tea Rooms, go to www.willowtearoomstrust.org.


